특징들을 살펴보면...
- Burn near any video file to DVD (거의 모든 비디오 파일들을 디비디로)
- Support for over 45 file formats (45개의 파일 포맷을 지원한다)
- Support for over 60 video codecs (60개의 비디오 코덱을 지원한다)
- Support for over 40 audio codecs (40개의 오디오 코덱을 지원한다)
- Easily add a menu (메뉴를 쉽게 추가할 수 있다)
- Add your own subtitles (자신이 원하는 자막을 추가할 수 있다)
- Easy to use interface (인터페이스가 쉽다)
- Burn your project to disc after encoding (인코딩 후에 디스크에 구울수있다)
- Completely free without any adware, spyware or limitations (무료이며 애드웨어, 스파이웨어 등이 없다)
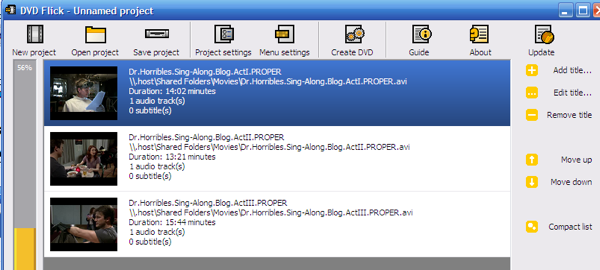
간단하게 번역하였습니다.
DVD Flick Guide
This short guide describes how to do a few common tasks in DVD Flick. The last update to this guide was based on version 1.3.0.0 of DVD Flick.
Creating a simple DVD (간단하게 DVD 만들기)
Step 1: Add your titles (제목 추가하기)
Click the Add title button and select one or more of the video
files that you want to add. (제목추가 버튼을 누른후, 디스크에 구울 비디오 파일(들)을 선택합니다)
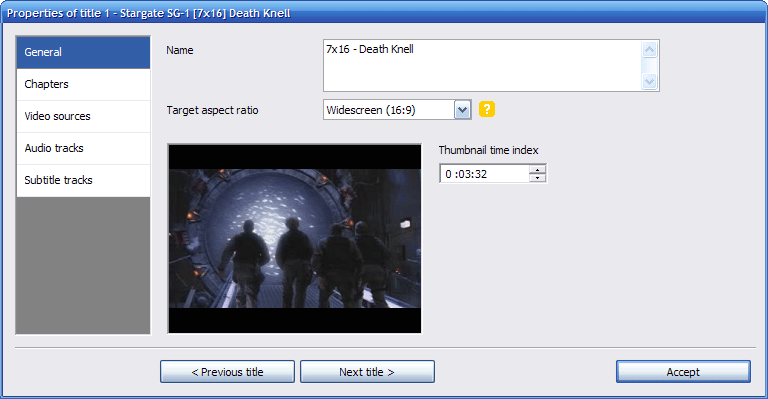
Step 2: Edit your titles (타이틀을 편집합니다)
You can edit each title by double-clicking it or by clicking on it once and pressing the Edit title button. Here you can set the number of chapters the title will have, either by entering a number or a time interval. You can also add subtitle files, different audio tracks and add another video source to the title.
Step 3: Configure your project (프로젝트를 구성합니다)
Click the Project settings button on the top to open the project's settings.
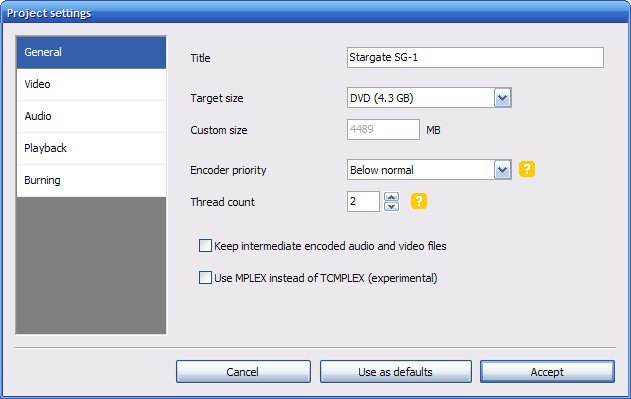
The only thing you really need to set here is the Target size under
the General tab, and the Target format, and Encoding profile
under the Video tab. (꼭 세팅해야할 것들은 최종파일의 크기 - general tab아래있음, 포맷, 인코딩 옵션 - 비디오 탭아래에 있음 입니다)
For Target Size, choose the size of the disc you will be burning your
project onto. Usually the default setting of DVD-5 (4.3 Gb) will be fine,
but if you wanted to use a dual layer disc or any other common format,
you can select that as well. (디스크 크기는 초기값이 4.3기가 입니다. 듀얼 레이어를 사용하실때는 원하는 사이즈를 선택하시면 됩니다)
For Target Format, you must choose which format is used on the standalone
DVD Player you will be watching the DVD on. For most Europe, Asian, African
and Oceanic countries this should be set to PAL, for most American countries
to NTSC. Some DVD Players support both formats, in which case you should
select the Mixed format. When using the Mixed format each separate title will
be determined to be either PAL or NTSC, and encoded as such. (한국에서 보실거면 PAL로 하시면 될겁니다 - 정확한것 아님. 미국이라면 NTSC로 하시면 됩니다)
For Encoding Profile, you must make a trade-off between the time it will
take to encode the DVD, or the quality thereof. Generally Fast offers
reasonable image quality, the difference between Normal and Best is almost
unnoticeable. Though if you are going to make a DVD that is near or over 3
hours in length, it is not recommended to choose Fast but Normal or Best instead
or the image quality will suffer. (인코딩은 오래 걸리면 퀄러티가 좋으니... 잘 생각해서 선택하시길 바랍니다. 노말 정도하시면 될듯합니다)
Step 4: Choose a destination folder (디스크가 저장될 폴더 선택)
At the bottom of the screen you can choose where DVD Flick will put
the encoded DVD files, as well as log files of the encoding process. It is
important to put this folder on a fast harddrive, which has enough free space
available. How much free space is needed is indicated on the lower right of
DVD Flick's main window. Do not set this to your DVD drive's path,
DVD Flick will first need to store the encoded data on a harddrive before it
can burn it to a disc. (반드시 하드디스크의 폴더를 선택하시길 바랍니다. 이는 하드에서 인코딩된 정보를 저장한 후에 디스크에 굽기때문입니다)
Step 5: Burning (드디어 굽기)
DVD Flick can burn your encoded project straight to disc if it is completed successfully.
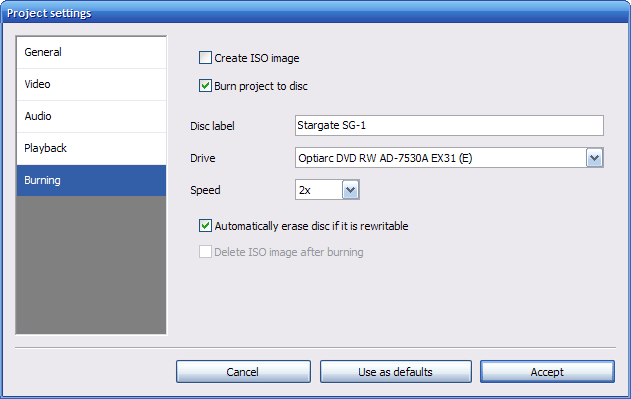
To enable this, check the Burn project to disc option under Project Settings, and the Burning tab.Disc label can be set to the label of the disc as displayed by your computer, but is not used by DVD players. Be sure to select the right drive to burn to, and to insert an empty disc in it before starting the encoding.
If you would rather have just an ISO image of the DVD to burn at your own leisure,
only check the Create ISO image option, and enter a disc label. (ISO 이미지로 구울수도 있네요!)
Step 6: Encoding (인코딩)
When you are all done creating your project, be sure to save it first. Then
press the Create DVD button and the encoding process will start,
providing you have enough free disc space. How long the encoding takes is
very much dependant on the speed of your CPU, and the harddrive that the project's
destination folder is on. It's best to let your PC do this during the night, or
during a very long coffee break. (인코딩이 오래 걸릴수 있으므로, 가급적이면 밤에 주무시기전에 하시는 것이 좋습니다.)
Add subtitles (자막 추가하기)
To add subtitles to a title, all you have to do is edit the title, go to the Subtitles tab, and use the Add button to add subtitle files to the title. You can reorder them using the arrow buttons.
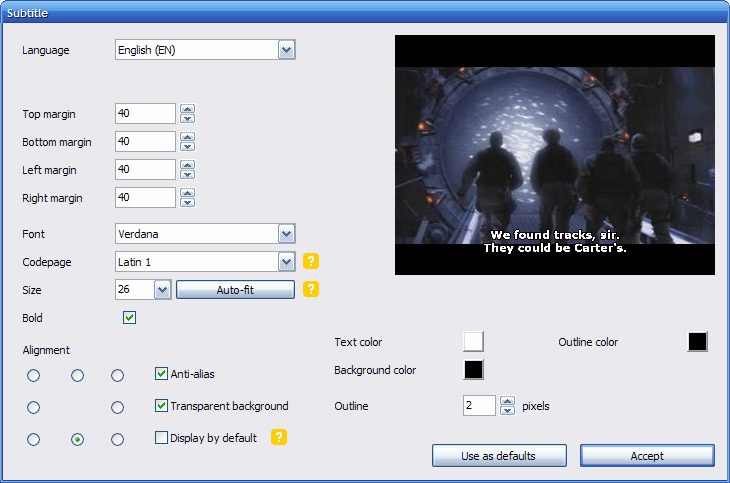
To edit the language, font, font size and positioning of a subtitle select it and press the Edit button. In the window that pops up you can change various properties of the subtitle. When you click the small preview you will see a larger approximation of how the subtitle will look.
The language setting is simply the language of the subtitle in question. The character set option is used to indicate in what way the subtitle file is encoded, so that the right characters can be drawn. For example if you have added a Chinese subtitle, you might have to set the character set to Chinese BIG5 or GB2312.
The Auto-fit button will adjust the subtitle's font size so that all subtitle lines will fit on screen. The display by default button will make sure that the current subtitle will be displayed automatically when the title containing it is played. If other subtitles have this set, only the first subtitle in the list will be displayed when the title starts.
Add audio tracks (오디오 트랙 추가하기)
A good example for when you want to add another audio track would be to add a second commentary track or some music.
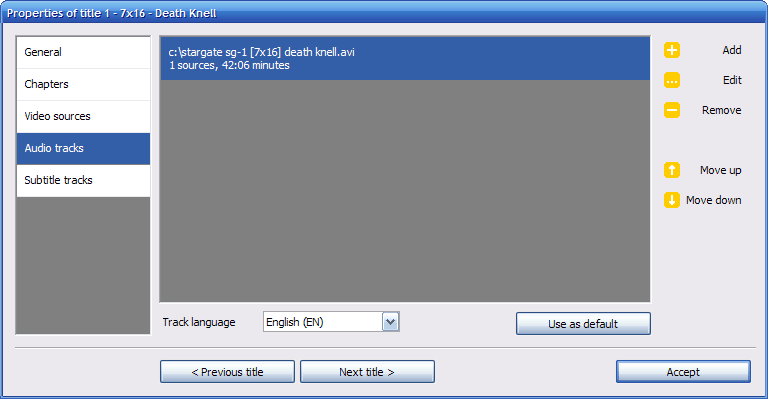
After you have added the title, edit it and go to the Audio tracks tab. There you can press the Add button, and then select the audio file or another video file that you will choose an audio track from. If you chose a video file or the file you chose has more than one audio track, you will be asked to choose which track to add.
Add a menu (메뉴 추가하기)
If you have many titles in your DVD Flick project, you might want to consider adding a menu to your DVD so that you can select a title to play from a list with names and thumbnails.
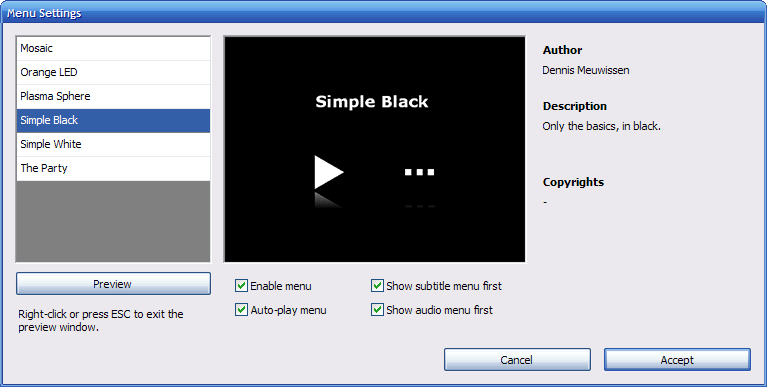
To add a menu, go to the Menu settings button. Here you can choose a template which will determine the appearance of the menu, as well as see it in action by clicking the Preview button. To exit the menu preview, either press ESC or right-click on the preview window. After you've chosen a template, be sure to enable the Enable menu checkbox so that the menu will be included on your disc.
You can also view menu pages that allow you to select an audio track or subtitle from the currently playing title. To access this menu while a title is playing, most DVD players have a Audio or Subtitle button on their remotes.
'컴퓨터활용 > 윈도우즈' 카테고리의 다른 글
| 아이콘 만들고 편집해주는 무료 프로그램 (6) | 2008.11.11 |
|---|---|
| 실시간 환율 정보 프로그램 (8) | 2008.11.08 |
| 소녀시대의 소녀시계 화면 보호기 (16) | 2008.11.07 |

